鸿蒙开发实践——ServiceAbility
ServiceAbility实践
项目简介
项目结构
├─ entry.src.main
	├─ com.example.serviceability
        ├─slice
            └─ MainAbilitySlice
        ├─ MainAbility
        ├─ MyService
        └─ MyApplication
	├─ resources.base.layout
        └─ ability_main.xml
    └─ config.json
效果
按钮1开启MyService。
按钮2连接到MyService。
按钮3断开与MyService的连接。
按钮4关闭MyService。
服务运行时会在状态栏显示。
不同的点击顺序,命令行输出的提示信息不同。
铺垫
在MyService里的每个生命周期函数里都加一句sout来显示各个方法执行的顺序。
public class MyService extends Ability {
    private static final HiLogLabel LABEL_LOG = new HiLogLabel(3, 0xD001100, "Demo");

    //在每个生命周期函数内加一句sout调试
    @Override
    public void onStart(Intent intent) {
        super.onStart(intent);
        HiLog.error(LABEL_LOG, "MyService::onStart");
        System.out.println("--------------------onStart");
    }

    @Override
    public void onBackground() {
        super.onBackground();
        HiLog.info(LABEL_LOG, "MyService::onBackground");
        System.out.println("--------------------onBackground");
    }

    @Override
    public void onStop() {
        super.onStop();
        HiLog.info(LABEL_LOG, "MyService::onStop");
        System.out.println("--------------------onStop");
    }

    @Override
    public void onCommand(Intent intent, boolean restart, int startId) {
        System.out.println("--------------------onCommand");
    }

    @Override
    public IRemoteObject onConnect(Intent intent) {
        System.out.println("--------------------onConnect");
        return new LocalRemoteObject() {};
    }

    @Override
    public void onDisconnect(Intent intent) {
        System.out.println("--------------------onDisconnect");
    }
}
开启和关闭ServiceAbility
此部分和”页面导航“里开启Ability的操作如出一辙,也就是说,我们只是在开启和关闭Ability,至于它是什么类型,无所谓。
核心代码:
MainAbilitySlice的onStart方法:
//按钮1开启MyService
Button btn1 = (Button) findComponentById(ResourceTable.Id_btn1);
btn1.setClickedListener(component -> {
    Intent intent1 = new Intent();
    Operation operation = new Intent.OperationBuilder()
            .withDeviceId("")
            .withBundleName("com.example.serviceability")
            .withAbilityName("com.example.serviceability.MyService")
            .build();
    intent1.setOperation(operation);
    this.startAbility(intent1);
});
//按钮4关闭MyService
Button btn4 = (Button) findComponentById(ResourceTable.Id_btn4);
btn4.setClickedListener(component -> {
    Intent intent3 = new Intent();
    Operation operation = new Intent.OperationBuilder()
            .withDeviceId("")
            .withBundleName("com.example.serviceability")
            .withAbilityName("com.example.serviceability.MyService")
            .build();
    intent3.setOperation(operation);
    this.stopAbility(intent3);
});
- 通过id获取Button对象,设置事件监听器。
- 调用startAbility和stopAbility方法,在intent对象的Operation属性里指定开启哪台设备的哪个应用的哪个Ability。
建立连接
核心代码:
MainAbilitySlice的onStart方法:
//按钮2连接到MyService
Button btn2 = (Button) findComponentById(ResourceTable.Id_btn2);

IAbilityConnection connection = new IAbilityConnection() {
    @Override
    public void onAbilityConnectDone(ElementName elementName, IRemoteObject iRemoteObject, int i) {
        System.out.println("----------------------连接MyService成功");
    }

    @Override
    public void onAbilityDisconnectDone(ElementName elementName, int i) {
        System.out.println("----------------------连接MyService失败");
    }
};

btn2.setClickedListener(component -> {
    Intent intent2 = new Intent();
    Operation operation = new Intent.OperationBuilder()
            .withDeviceId("")
            .withBundleName("com.example.serviceability")
            .withAbilityName("com.example.serviceability.MyService")
            .build();
    intent2.setOperation(operation);
    this.connectAbility(intent2,connection);
});
-
通过id获取Button对象,设置事件监听器。
-
新建连接对象,重写onAbilityConnectDone和onAbilityDisconnectDone方法,每个方法里都写一句sout用于调试。
- onAbilityConnectDone:连接成功建立后执行。
- onAbilityDisconnectDone:连接建立失败后执行。
-
调用connectAbility方法,传递intent和connect对象。
MyService:
@Override
public IRemoteObject onConnect(Intent intent) {
    System.out.println("--------------------onConnect");
    return new LocalRemoteObject() {};
}
- 注意返回语句,返回一个LocalRemoteObject对象。
试图与Service建立连接时,触发onConnect方法,它返回一个LocalRemoteObject对象,在这个实例中它返回的是MyService这个Ability,触发回调函数onAbilityConnectDone或者onAbilityDisconnectDone。
关闭连接
核心代码:
MainAbilitySlice的onStart方法:
//按钮3断开与MyService的连接
Button btn3 = (Button) findComponentById(ResourceTable.Id_btn3);
btn3.setClickedListener(component -> {
    if(connection != null){
        this.disconnectAbility(connection);
    }
});
- 若connection对象存在,就调用disconnectAbility方法即可。
前台Service
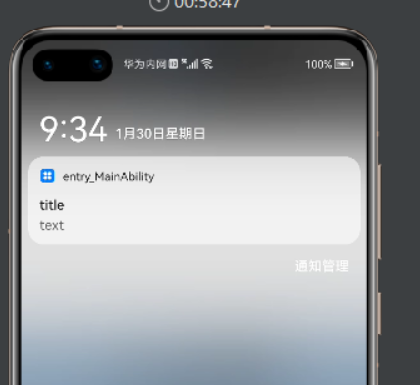
前台Service会始终保持正在运行的图标在系统状态栏显示。
核心代码:
MyService的onStart方法:
// 创建通知,其中1005为notificationId
NotificationRequest request = new NotificationRequest(1005);
NotificationRequest.NotificationNormalContent content = new NotificationRequest.NotificationNormalContent();
content.setTitle("title").setText("text");
NotificationRequest.NotificationContent notificationContent = new NotificationRequest.NotificationContent(content);
request.setContent(notificationContent);

// 绑定通知,1005为创建通知时传入的notificationId
keepBackgroundRunning(1005, request);
这段进行一个简单的Ctrl+C、V就行,注意以下几个点:
-
1005这个notificationId不能与其他的服务重复
-
title和text在图中对应:

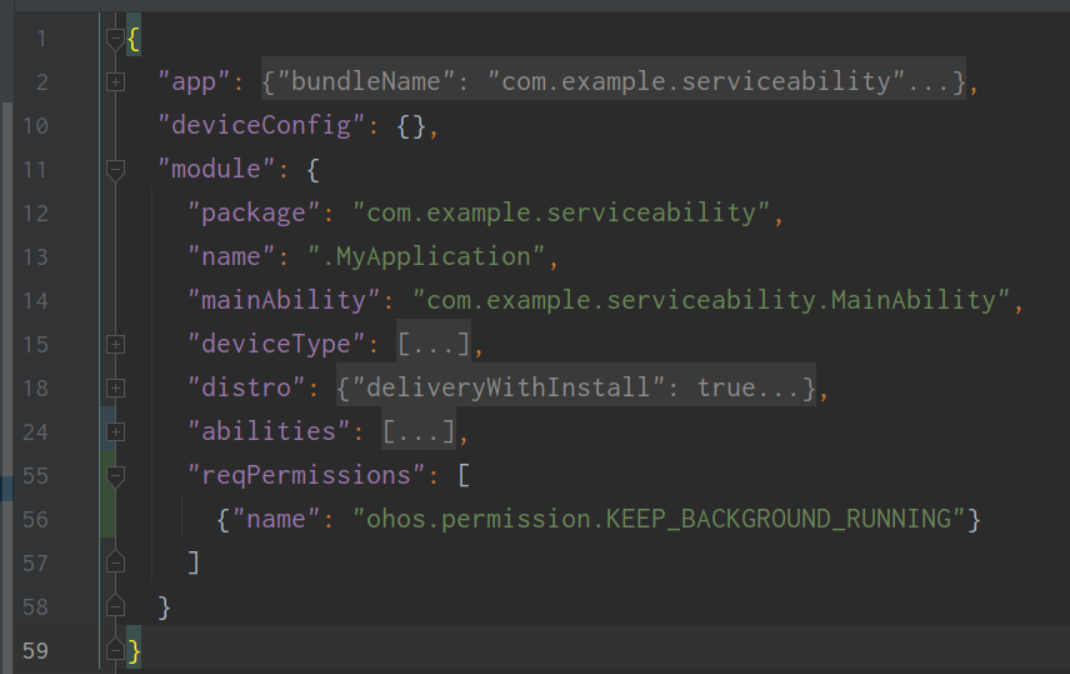
config.json中还要申请常驻后台权限:
"reqPermissions": [
  {"name": "ohos.permission.KEEP_BACKGROUND_RUNNING"}
]
位置如图所示:

生命周期分析
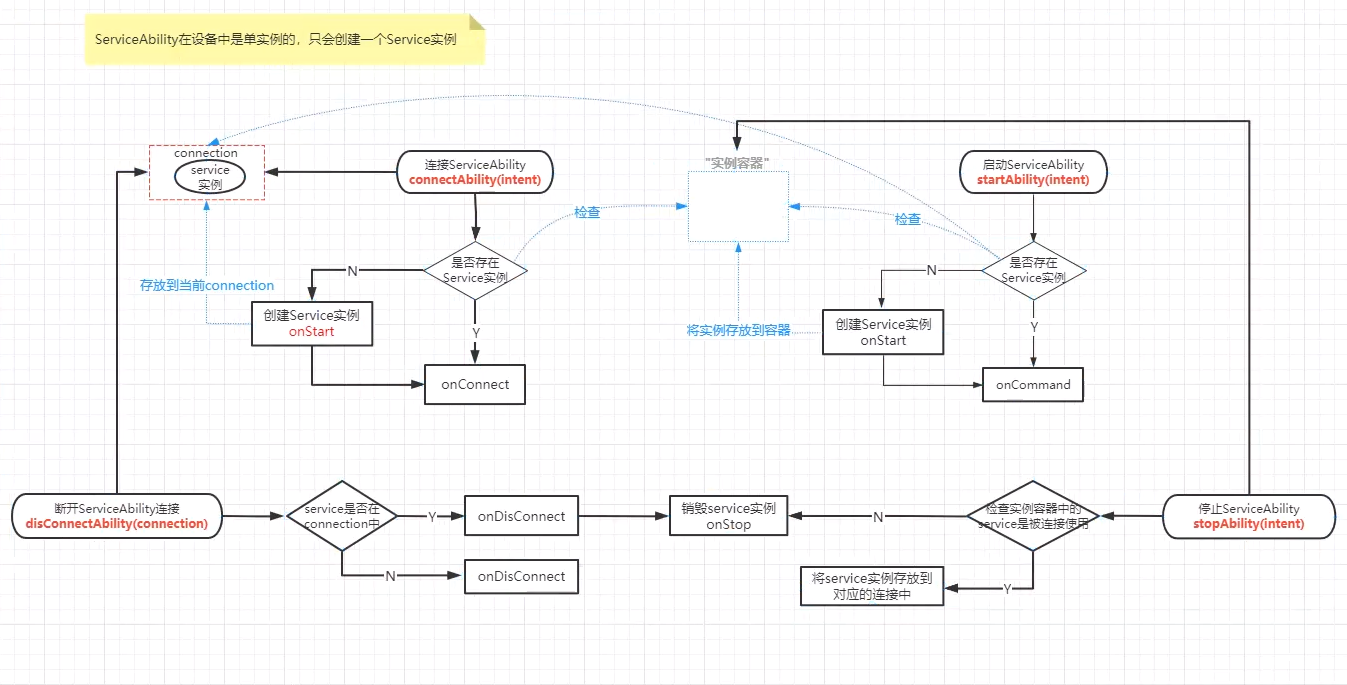
整个执行过程如图所示:

-
启动:
-
若MyService已建立,执行onCommand。

-
若未建立,执行onStart和onCommand。

-
-
连接:
-
若MyService已建立,则执行onConnect。

-
若未建立,则执行onStart和onConnect(红字忽略)。

-
-
断开连接:当连接存在,且
-
MyService是手动创建的,不是由连接唤起的,只执行onDisconnect

-
MyService是由该连接唤起的,执行onDisconnect、onBackground、onStop。

-
-
关闭:当MyService没有被连接时,才能关闭,执行onBackground和onStop。

结束语
项目源码
https://github.com/leeshy-tech/HarmonyOS_example/tree/main/ServiceAbility
 Leeshy's Blog


